For this little battle I decided to do something slightly different. Readers who play English Civil War games will be aware that the Royalist armies often had a greater proportion of cavalry than their opponents. Phil Barker goes as far as to say that in some cases their forces were often cavalry supported by commanded shot. Parliamentary armies, at least until the formation of the New Model, tended to have a better balance of horse and foot but, with certain notable exceptions (Haselrig's 'Lobsters' and the Eastern Association horse being two), their cavalry was often of an inferior quality.
Our campaign has arrived at a point in late 1643 where the main field armies of both sides are engaged in the manoeuvrings that culminated in the First Battle of Newbury. Much of the Royalist cavalry and the best of the infantry from Borsetshire are serving with the King. Felpersham, the Royalist stronghold and county town is looking vulnerable - there aren't enough troops to man its extensive fortifications and earthworks.
Parliamentarians in the county have mounted a scratch offensive to try and seize Felpersham by coup de main, and their little army marched on the town from the north west, moving quickly without baggage or heavy artillery. Sir Charles Moncrief, acting Royalist commander, sensed the danger and responded quickly. He marched out of Felpersham, also without baggage and heavy guns, with a force comprising local militia and what mounted troops he could muster.
The Royalist Army was therefore an unusual one - a mere 400 horse and 200 dragoons but supported by nearly 3000 foot - in other words a reversal of the usual proportions of foot and horse. The foot suffered from a shortage of muskets. such that the ratio of shot to pike was 1:1.
Parliament by contrast fielded 1100 horse, mainly 'trotters' trained to caracole, and fewer infantry than their opponents but with twice as many shot as pike.
The battle that followed was remarkable for the Royalists' lack of ability to force a decision - their usual offensive arm was weak and accordingly what followed was, to paraphrase a later general of the horse and musket era a 'long hard pounding'.
Full AAR to follow
Thursday, 12 September 2013
Wednesday, 11 September 2013
Borsetshire September 1643
We left the war in Borsetshire in stalemate in late May 1643, with the Royalist forces based in Felpersham, and their Parliamentary opponents controlling Borchester, the other major town in the county.
The drawn battle of Ashby Street had, as predicted, proved a strategic setback for the Roundheads, as their scheme to invest Felpersham by occupying the villages around the city had been thwarted.
During the early summer there was little fighting, aside from the odd skirmish as opposing patrols of dragoons or cavalry encountered one another in the villages between the two major settlements.
In June 1643 the Royalist commander in the county, the Earl of Grantham, received orders from Prince Rupert to muster all the Royalist cavalry and best of the infantry in Borsetshire and to join the King's offensive that culminated in the storming of Bristol the following month.
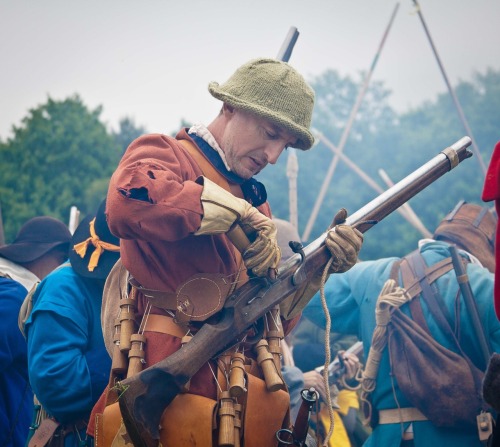
A Parliamentary Dragoon prepares his carbine whilst in the background pikemen prepare to fight
The garrison of Felpersham was thus reduced to largely local militia, whose terms of service meant they would not leave the county. Sensing an opportunity whilst the King's main field army pursued the Earl of Essex after the relief of Gloucester, the Borsetshire Parliamentarians decided to march on Felpersham once more.
The harvest was in and the Roundheads were on the march as the local Royalist commander, Sir Charles Moncrief, weighed up his options. His problem was that were not enough troops to man the fortified villages and earthworks that protected Felpersham without the absent regiments that were fighting with the King. He did know however, the direction of the Roundhead thrust, thanks to intelligence from his scouts.
Accordingly, in mid September of 1643 Moncrief led his men to meet the Roundhead advance. The subsequent battle was fought near the village of St Johns Parva.
A game of DBR is scheduled for this evening
The drawn battle of Ashby Street had, as predicted, proved a strategic setback for the Roundheads, as their scheme to invest Felpersham by occupying the villages around the city had been thwarted.
During the early summer there was little fighting, aside from the odd skirmish as opposing patrols of dragoons or cavalry encountered one another in the villages between the two major settlements.
In June 1643 the Royalist commander in the county, the Earl of Grantham, received orders from Prince Rupert to muster all the Royalist cavalry and best of the infantry in Borsetshire and to join the King's offensive that culminated in the storming of Bristol the following month.
A Parliamentary Dragoon prepares his carbine whilst in the background pikemen prepare to fight
The garrison of Felpersham was thus reduced to largely local militia, whose terms of service meant they would not leave the county. Sensing an opportunity whilst the King's main field army pursued the Earl of Essex after the relief of Gloucester, the Borsetshire Parliamentarians decided to march on Felpersham once more.
The harvest was in and the Roundheads were on the march as the local Royalist commander, Sir Charles Moncrief, weighed up his options. His problem was that were not enough troops to man the fortified villages and earthworks that protected Felpersham without the absent regiments that were fighting with the King. He did know however, the direction of the Roundhead thrust, thanks to intelligence from his scouts.
Accordingly, in mid September of 1643 Moncrief led his men to meet the Roundhead advance. The subsequent battle was fought near the village of St Johns Parva.
A game of DBR is scheduled for this evening
Friday, 6 September 2013
Battlefield Visits: One - Naseby
I've not been posting as frequently in recent weeks because I spent the end of June and all of July visiting Britain and Europe. Part of this was work related but I did manage to take four and a half weeks' holiday and indulge myself cycling in France as well as visiting friends and relatives in Britain.
I also contrived to visit four places of English Civil War significance: York, Marston Moor, Chester and Naseby. I'll try and cover these visits in my next few posts.
Like all battlefields (to a greater or lesser extent), Naseby is only interesting if the visitor has a reasonably good understanding of what happened there. This is assisted by some good interpretation material (much of it culled from Osprey publications) that is positioned at key points. This means that an ordinary looking hedgerow assumes much greater importance in the eyes of the visitor. When you know you're looking at Sulby hedges, and in your mind's eye at least you can see Colonel Okey and his dragoons lined up and shooting at the Royalist cavalry, it stops being just another hedgerow.

Above: one of the interpretation boards around the battlefield.

Above: Sulby Hedges looking from behind the New Model Army Dragoons' position

Above: The battlefield looking from the centre of New Model Army's position at the beginning of the battle- the Royalists were drawn up on the rise behind the hedges in the distance
The battlefield is compact and can be easily traversed by car or bicycle in an afternoon using the network of country lanes in the area. The interpretation sites are invaluable in orientating the visitor and are a big help if you or your companions' knowledge of what happened is sketchy. They were certainly useful for me in explaining it all to my mother as the illustrations on the boards go some way to bringing the scene to life.
My single greatest insight from this visit came from justt how undulating the ground was directly to the rear of the centre of the Royalist's initial position i.e. where the King's infantry made its last stand. With the smoke and confusion of battle, the restricted lines of sight as a consequence of the undulations would have considerably added to the 'friction' that the opposing commanders had to contend with. No surprises if low PIP dice were rolled...
Subscribe to:
Comments (Atom)